


A standard shower uses 20 litres of water per minute. This accounts for 25% of your household water use. Now, what if that water was leaking?
If your shower isn’t properly waterproofed, then every time you shower, water seeps past the tile and into the walls of your home. This can foster mould and mildew growth.
Eventually, it will weaken the structure of your home. Now you have a health hazard and a dangerous situation on your hands.
There are a few ways of waterproofing showers that are considered correct. We are going to go over them and help you stop the leaks.
Is Shower Waterproofing Required?
While there are a few different ways to go about it, waterproofing is required. You must have a moisture barrier between the shower and the cement backer board and wood framing.
This moisture barrier isn’t completely watertight. It has some breathability to it. Two examples of barrier materials are special plastic sheeting or tar paper.
It will get stapled up and hung around the wall. It can be loose and overlapped without being tightly sealed on all edges. This is a viable solution for showers that don’t need heavy waterproofing.
A more watertight option is a waterproofing membrane. It is effective in more extreme conditions and horizontal surfaces.
1. Traditional Shower Construction
For the longest time, showers were built out of mud and chicken wire. Then there would be a copper or lead pan underneath the floor of the shower. A rubber mat would “waterproof” under the tile.
While the mud is still occasionally used today, most construction uses a cement or fibreboard instead.
This method works well for waterproofing the vertical sides of a shower. However, it is not acceptable for horizontal surfaces.
2. Liquid Waterproofing Membranes
Liquid waterproofing gives you a lot more freedom in how you built your shower. You can create any configuration you want, then paint over it with a liquid membrane.
While this makes the process sound super easy, there is a bit more to it. You need to make sure that you achieve the proper thickness with each coat. A good rule of thumb is that if you can see the printing on the board, your coat is too thin.
You also need to keep in mind the cure times. You’ll need to wait a day for each coat of waterproofing to dry before you paint the next layer. This means it can take days to completely waterproof your shower.
You also need to think about the cure time of your mud pan. This is the waterproofing that goes under the shower. You need to wait for the mud to cure for a minimum of 72 hours before you apply the waterproofing paint.
This means that construction times can be significant. If your builder isn’t patient, your waterproofing is compromised.
3. Sheet Membranes
The third type of shower waterproofing is sheet membranes. These have a few advantages; you don’t have to worry about getting the right thickness, and you don’t have long installation times.
There are some drawbacks to these large sheets. The biggest being that there are larges seams between each sheet. To address this, manufacturers require an overlap of at least two inches.
The problem comes in when you cover the corners. You’ll use a banding material over the two layers of sheeting. This becomes thick though and will cause the corners to stick out further than the flatter middle parts of the shower.
You’ll also need to be careful that you have smooth overlapping and bonding of the seams. A wrinkle can compromise all of your efforts.
4. Waterproof Foam Backer Board
One of the most common methods for waterproofing showers today is a foam backer board. These building panels essentially work the same as the other methods, but take several steps out of the process for the builder.
The backer boards get mounted on the wood frame, and the tile is installed on top of the foam board. The boards have waterproofing on their surface so moisture can’t seep through to the backside of the board.
They also use urethane glue, so even the seams are waterproofed.
The downside of this type of waterproofing is that it is noticeably more expensive than other methods. This makes it a less likely choice for budget-conscious builders.
Another problem is that these boards have more flex. Tile does not like flex.
5. Ultra Bond Technology
So far, we have discussed traditional shower waterproofing methods. While they are the standard in Australian construction, they all work to stop water after it has breached the surface of the shower.
New methods of waterproofing stop the water before it can get past the surface of the shower. Ultra bond technology seals your entire shower.
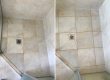
First, any loose or cracked tiles are repaired. All old grout is stripped and replaced with Ultra Bond Grout. The wall and floor junctions have Ultra bond Product applied to them.
Then Ultra Bond Clear Sealant is applied to the entire floor area. The beauty of this waterproofing system is that you can use it on new and existing showers. You’ll also have a warranty that your shower is 100% sealed.
Start Waterproofing Showers the Right Way
Now that you know the right way to waterproof a shower, how sealed is yours? If you are building a new shower, then the first four options are great.
However, waterproofing showers that are already constructed are going to need a different approach. This is when Ultra Bond Technology is the way to go.
Contact us today and let us do the shower waterproofing for you.