
Leaking showers are a minor inconvenience that can cost you a fortune if the problem is ignored.
Every drip from the leaking faucet will gradually raise your water bill. And if it’s leaking hot water? Expect to see more zeros on that energy bill too. Leaking showers can also cause major damage to the property.
Don’t wait for your leaking shower to become a major hassle. Here’s 7 easy steps to fix your leaking shower.
Step 1 – Faulty Shower Faucet
Shower drains aren’t the only section where water can escape from.
Below are some of the most common causes of water leakage:
- Blocked or corroded showerhead
- Faulty shower faucet
- Missing sections of tile grout
- Broken tiled floor or wall
- Degraded silicone between wall/floor joints
- Failing waterproof membrane
- Damaged or loose pipeline
- Interior plumbing fault
Most of these issues can be identified by visually inspecting the shower itself. Any defects on the tiled wall or floor surface will be easy to spot including cracked grout, broken tiles or missing silicone.
However, more serious problems with the interior plumbing will need to be inspected by a professional.
Step 2 – Repair the Shower Faucet
Most shower faucets fail when the O-ring degrades and can no longer control the flow of water. Other common issues occur with the internal washers, valves and temperature stems.
Use a screwdriver to open the faucet and replace any parts that look worn out, corroded or degraded. Test the water after each replacement. The water shop stop flowing almost instantly after the supply is cut off.
Step 3 – Replace the Shower Head
Over time, shower heads will degrade and collect hard mineral deposits that interrupt water flow. You could replace individual parts to fix the leaking shower, but it’s faster and just as cost-effective to replace the entire unit. In fact, some individual shower heads can be purchased for as little as $25.
Replacing a shower head is quick and easy. Wrap an adjustable wrench around the head and turn counter-clockwise until it’s loose enough to remove. Get rid of any excess materials, wrap thread sealed tape (Teflon) around the threads of the pipe, and install the replacement head.
Test the water. If leaking persists, try tightening the shower head more until it stops.
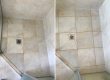
Step 4 – Replace Broken Tiles
Got any cracked, chipped or broken tiles on the shower surface? Until you fix or replace them, your shower will keep leaking.
Head down to your local hardware store and purchase new tiles that match your existing set. Depending on the condition of the tiles – particularly if water is leaking below – they might already be loose and easy to remove. Otherwise, use a chisel to break out the tiles into smaller pieces.
Ensure the surface is smooth and clean before installing the new set. Lay down ceramic adhesive or tile cement and place the tile itself down – gently apply pressure. Finally, wait until its dry then apply grout to create a watertight seal.
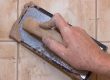
Step 5 – Regrout Shower Tiles
Grout is not a waterproof solution. But it does fill the gap between your tiles and ensures a smooth professional finish. When fixing a leaking shower, be sure to replace worn out, cracked or split grout old grout that has worn out, cracked or split. Even the tiniest holes are enough for water to breach the premise.
Use a scraping tool to remove old grout, and wipe down the surface with a damp sponge to ensure it’s clean. Regrout the whole tile with a grout float, then let it dry for at least 20 minutes. Finally, wipe the excess grout off the face of the tile, and vacuum up debris left on the ground.
Step 6 – Silicon the Gaps
Silicone sealant fills the gap between wall and floor joints between shower screens, basins and bathtubs.
Old silicone will become mouldy, cracked and discoloured. If left untouched, it’ll eventually get loose and allow water to enter unwanted places. Thankfully, it’s easy to replace your old silicone with a new watertight layer.
Apply silicone remover to the current layer and give the solution 2-4 hours to soften the silicone. Use methylated spirits to remove the old silicone and ensure the surface is smooth, clean and dry.
Lastly, apply the new silicone sealant to the exposed gap. Allow to dry for at least 2 hours before using the shower.
Step 7 – Reseal the Shower
Shower sealant is a silicone treatment that penetrates tile grout to form a permanent waterproof barrier. The substance prevents water from escaping through the grout and offer long-term protection from water damage. Without the need to remove tiles, you can reseal the entire surface and fix your leaking shower for good.
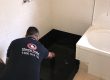
There are commercial products you can buy off the shelf to reseal the shower. But for peace of mind, we recommend hiring a professional to do the job. A waterproofing specialist will identify the exact cause of the leakage and use specialised tools and products to resolve the problem.
Better still, you get a waterproof guarantee with every service!
Call Shower Sealed on 1300 519 133 or send your enquiry to request a FREE quote.