


The risks of water damage in a home are extensive. It can often lead to irreparable damages. In 2018, over $320 million was given to over 30,000 homeowners with claims of water damage.
Being that showers are wet half the time, they are prime victims to water damage. To save yourself the time, hassle, and headache of replacing a ruined wet room, look into preventing the risk with proper shower waterproofing.
Let’s take a look at everything you need to know about how the professionals go about waterproofing showers!
What is Shower Waterproofing
Waterproofing your shower ensures that no water damage can develop in your wet room.
Waterproofing showers is a process best handled by the professionals. They possess the skills, tools, and techniques to properly waterproof shower walls so that they stay clean and safe for years to come.
Why You Need to Seal Your Wet Room
There are many different reasons you need sealants in your showers and wet rooms.
The importance of shower waterproofing is to prevent water from entering the gaps between tiles and the shower wall liner. The cement-based flooring that most showers are based on can be very porous. Any contact with water and all the particles caught in the flow will seep right into your wet room floors.
This can lead to toxic mould and mildew, causing irreparable damage that often requires fixture replacement.
Second, sealants like grout act as structural support to hold the tiles in place and together. For ceramic tiles and terra-cotta tiles, it is especially useful as these tiles do not always have a uniform shape. Grout fills in the awkward gaps between these special tiles, securing them from any shifting or slight movement.
Also, grout offers some helpful texture in-between each tile. This is especially useful on a slippery floor, as this welcomed texture adds a bit of “grab” for walking over, like the treads on a shoe.
As an added benefit, sealants can enhance the cohesiveness of the wet room. With colour-tinted grout, the sealant can be coordinated with other colour palettes in the room to complete a full look.
Lastly, epoxy sealants can be used to fully cover the tiled walls and flooring, providing a polished sheen over the whole room.
How the Pros Seal Showers
It’s a daunting task, but professionals have the skills and experience necessary to successfully seal and protect a shower room.
Let’s take a look at what the experts will use. After, we’ll explore the process of properly sealing your shower.
Tools of the Trade
- Utility knife
- Bucket
- Drywall saw
- Putty knife
- Cement board
- Cement board screws
- Cement board joint tape
- Tiles
- Tile adhesive
- Grout
- Grout scraper
- 100% silicone caulk
- Waterproof sealant
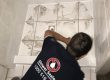
Analyze and Assess
This step is necessary for properly replacing worn flooring. When dealing with water, there’s always a good chance of rot.
The warning signs of water damage behind a shower wall liner are mould, mildew, loose tiles, fading colour, and peeling caulk. If this is the case, it’s time to rip out the rot and replace it.
The expert can either use a utility knife or a hammer to remove the shower wall liner tiles. Tiles can be very fragile and finding a matching tile as a replacement can be very challenging, so a knife is preferred. However, if preserving the tiles isn’t needed, a hammer can get the job done fast and easy.
Salvageable tiles will be set aside in a bucket of water to begin cleaning them off. A utility knife can be used to scrape off any excess matter.
Next, the damaged drywall gets cut out with a saw. The expert will then inspect the surrounding area for further rot. Any rot must be cut out, and then disinfected with bleach to remove any mould or mildew.
Then, the professional will prepare for the installation of your new, waterproof shower room.
Installing the Tile Flooring
Using a saw, the experts cut a cement board to size. They then install it next to the drywall with cement screws and joint tape. Following manufacturer’s directions, they then mix the thinset adhesive together and apply it between the cement board and drywall.
Once dry, the surface gets prepared for the tile installation with more adhesive. The tiles are then carefully placed onto the cement board with the appropriate gap space.
Lastly, the tiles get left to dry before applying the grout sealant to the tiles.
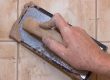
Applying the Sealant
Once the thinset adhesive has dried and cured, the experts begin the grouting process.
A grout that matches the tiles gets applied in the gaps between the tiles. They will do this with either a grout applicator to paint the tile joints with grout. Or, using a spraying device, they will apply the grout to all the tiles at once and then remove the excess with a scraper.
Finally, they use 100% silicone caulk to seal the gap between the shower wall liner. This caulk is critical in preventing water from penetrating the joints that have been freshly set. Be sure to suggest a high-quality caulk to ensure a complete seal.
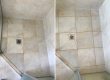
Final Coat Finish
Shower waterproofing refers to the waterproofing membrane used to guard the surface underneath tile flooring.
This waterproofing membrane acts like a bucket to catch and prevent any water that penetrates the surface of your shower walls. The waterproofing membrane is the last defence needed to ensure a fully sealed shower or wet room.
Once all the tiles, grout, and adhesives are set, a final coat of sealant will get applied all over.
This will ensure the longevity and quality of your newly sealed and waterproof shower room. It will leave your wet room looking polished and pristine!
Get Your Shower Sealed Now!
Sealing your shower properly is one step to ensure the vitality and integrity of your home. Protecting your home from invaders big and small is the best way to live safely and comfortably.
With over 20 years of experience, Shower Sealed is qualified to offer guaranteed assurance for our products and services.
If you’re by Brisbane or the Gold Coast area, give us a call and we can consult you on your shower and wet room needs!